When I first replatformed this site to being a Jekyll static blog served from S3 I just used simple S3 static site serving as opposed to front-ending the S3 bucket with CloudFront. This is easy to setup but it has a couple of key drawbacks: serving isn’t as fast and you can’t use TLS with plain static S3 web hosting.
I just got around to addressing this and I’ve updated my GPLv2-licensed open-source CloudFormation templates so you can now either use plain S3 static hosting or add CloudFront with TLS certs generated in Certificate Manager.
Here’s how to use my solution:
Assumptions, Pre-Requisites and Notes
This configuration assumes that you want to host your site on a “naked” domain - e.g. brendonmatheson.com - and have the “www” domain - eg. www.brendonmatheson.com - redirect to the naked domain.
- brendonmatheson.com (naked domain) -> serves the site
- www.brendonmatheson.com (www domain) -> redirects all requests to brendonmatheson.com
If you need a different arrangement then you’ll need to customize templates 2, 3 and 4.
If you want to use CloudFront then we also assume that you are using Route53 to host the zone for your domain name - e.g. brendonmatheson.com. However the templates do not create the hosted zone so it is a pre-requisite for you to set that up for example via the Route53 console. If you don’t want to use CloudFront then there is no assumption that you’re hosting DNS in Route53.
Template 4 requires the ID of your hosted zone so it can create records in there, so you will need to get that ID from Route53 so you can plug it in as a parameter.
Note CloudFront can only use Certificate Manager certs that are deployed in us-east-1. For administrative ease I’m deploying all CloudFormation stacks including all buckets, the TLS certs and the CloudFront distributions also in us-east-1 so that I don’t have to switch between regions when maintaining my sites. If you want to deploy your buckets in another region, my templates support that because in template 4 you can specify the region where your buckets are located. Log and site buckets must be in the same region.
Clone
Get the templates from my GitHub repo either by downloading a ZIP bundle or even better by cloning the repo:
git clone https://github.com/brendonmatheson/aws-static-site.git
You will now have the following files:
01-log-bucket.yaml
02-site-buckets.yaml
03-certificates.yaml
04-cloudfront.yaml
LICENSE
README.md
Access Logs Bucket
The first template in the set 01-log-bucket.yaml creates a S3 bucket for storage of web access logs. If you’re setting up multiple sites you can just create one access logs bucket to collect the logs for all your sites.
If you already have such a bucket set up you can actually skip this step and use that bucket as long as you have a bucket policy that permits delivery of web logs to it by S3. You can see an example of such a bucket policy in the 01-log-bucket.yaml template.
Note that this bucket is create with all public access disabled. There should never be any need for open access to your web logs.
This template has a single LogBucketName parameter that allows you to specify the name for your log bucket. So to deploy this stack from the command-line:
aws cloudformation create-stack \
    --stack-name my-webaccesslogs \
    --parameters ParameterKey=LogBucketName,ParameterValue=my-webaccesslogs \
    --template-body file://01-log-bucket.yaml
Or to deploy via the AWS console:
- Navigate to CloudFormation from the Service menu
- Click the Create Stack option at the top-right and choose “With new resources”
- Select Upload a Template File
- Browse to select 01-log-bucket.yaml
- Click Next
- Enter a name for your stack - e.g. “my-webaccesslogs” - you might have a stack naming standard you can apply here
- Enter a name for your log bucket - e.g. “my-webaccesslogs” - you may also have a S3 bucket naming standard that is applicable here
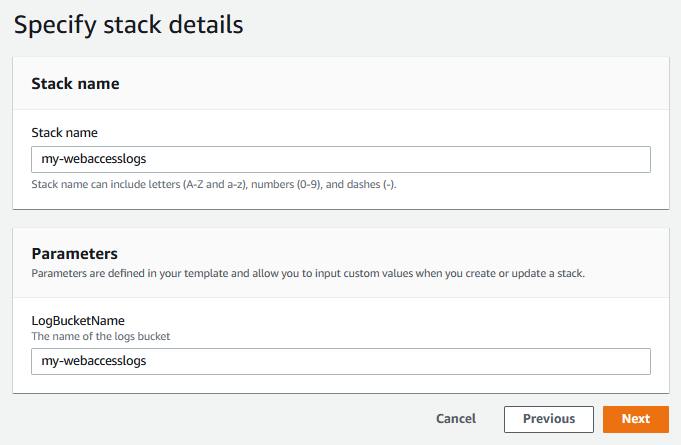
- Click Next
- Click Next
- Click Create
This stack only takes a minute or so to deploy. Once its complete give the logs bucket a quick visual inspection to make sure it’s named correctly and has the permissions set properly.
Site Buckets
Our second template 02-site-buckets.yaml creates two buckets:
- Naked Domain Bucket - setup for static site hosting
- Redirector Bucket - the www domain created as a private bucket with site redirection enabled
The Naked Domain Bucket is created with static site-hosting enabled and with access logs directed to the logs bucket with the path (key prefix) being the naked domain name.
The Redirector Bucket on the other hand is created as a private bucket with redirection enabled. The protocol (http or https) for redirection is supplied as a parameter. If you’re using plain S3 static site hosting then the protocol must be http but if you’re planning to use CloudFront then the protocol must be https.
To deploy the stack from the command-line:
aws cloudformation create-stack \
    --stack-name mysitename-buckets \
    --parameters ParameterKey=LogBucketName,ParameterValue=my-webaccesslogs \
        ParameterKey=NakedDomainName,ParameterValue=mysitename.com \
        ParameterKey=RedirectorProtocol,ParameterValue=https \
    --template-body file://02-site-buckets.yaml
Or from the CloudFormation console - similar to before:
- Navigate to CloudFormation from the Service menu
- Click the Create Stack option at the top-right and choose “With new resources” then select Upload a Template File
- Browse to select 02-site-buckets.yaml
- Click Next
- Enter a name for your stack - e.g. “mysitename-buckets”
- Enter the values for the LogBucketName, NakedDomainName and RedirectorProtocol parameters
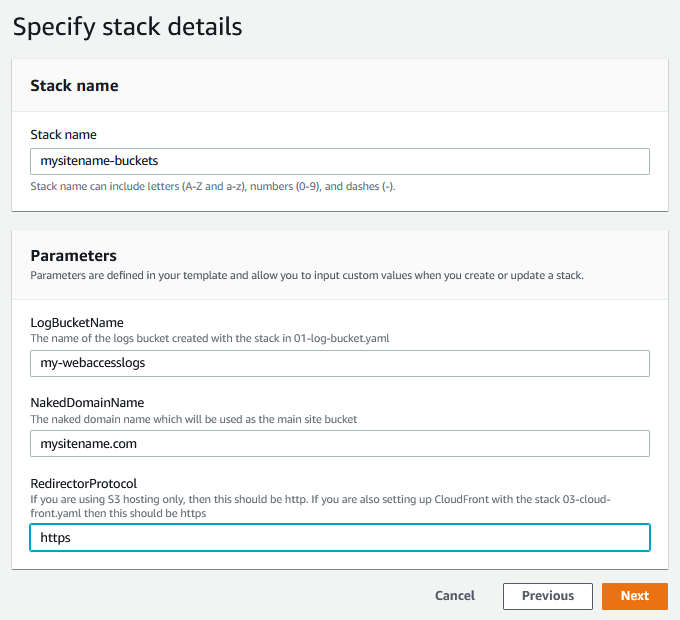
- Click Next, Next, Create
TLS Certificates
Next in 03-certificates.yaml we will create the TLS certificates through Certificate Manager. This is separated into it’s own template because depending on how you’ve configured DNS it may take some time to verify the certificates. If you are using Route53 for hosting the zone then the process is semi-automatic and quite fast. On the other hand if you’re using a different DNS provider (e.g. GoDaddy) you will need to manually create a CNAME record using in your providers admin console so that Certificate manager can verify the certificate request.
Critical Note: this stack must be deployed in us-east-1. CloudFront can only use certificates that are managed through the us-east-1 region.
To deploy the stack from the command-line:
aws cloudformation create-stack \
    --region us-east-1 \
    --stack-name mysitename-certificates \
    --parameters ParameterKey=NakedDomainName,ParameterValue=mysitename.com \
    --template-body file://03-certificates.yaml
Or from the CloudFormation console:
- From the region drop-down at the top-right select the us-east-1 / North Virginia region
- Launch Create Stack and Upload a Template File and browse to 03-certificates.yaml
- Enter the name for your stack - e.g. “mysitename-certificates”
- Enter the value for NakedDomainName
- Click Next, Next, Create
Once the stack is deployed you will need to create the CNAME records to allow Certificate Manager to verify you control the domain name. If you’re using Route53 the verification is semi-automated - Look in Certificate Manager for the option to add a record to Route53:
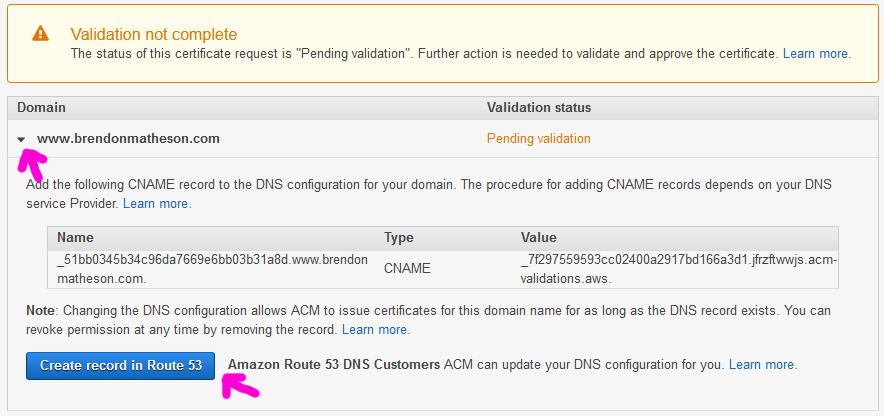
If you’re using a different DNS provider then follow the on-screen guidelines or consult the documentation for the steps to complete verification.
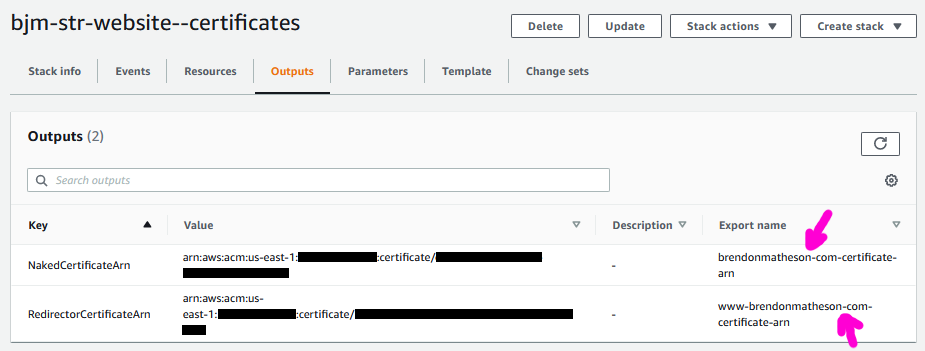
Note that this template exports values containing the ARN’s of the two certificates so that they can be automatically linked into the CloudFront distribution:
CloudFront Distribution
Our final stack 04-cloudfront.yaml will create two CloudFront Distributions:
- Naked Domain Name - backed by the static site bucket using the S3 origin type
- Redirector Domain Name - backed by the redirector bucket treated as a generic HTTP origin
Note: when I first tried to get this going I configured the redirector to use the S3 origin type - this doesn’t work for the redirection.
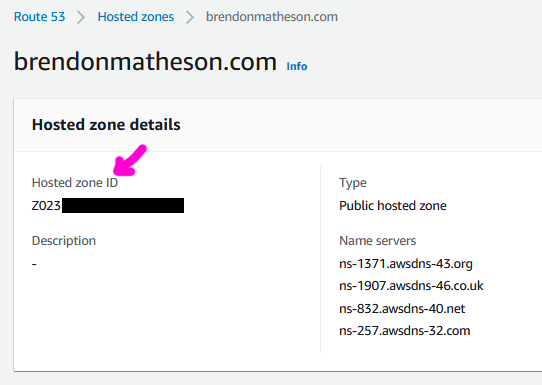
This stack also creates DNS records in Route53 for the naked domain and one of the redirector domain, therefore you will be providing the ID of the hosted zone - you can grab this from the Route53 console:
Note: I suggest deploying this stack in us-east-1 too so that it is administratively local to your Certificate Manager certs. Technically you can deploy it in any region however.
To deploy the stack from the command-line:
aws cloudformation create-stack \
    --region us-east-1 \
    --stack-name mysitename-cloudfront \
    --parameters \
        ParameterKey=HostedZoneId,ParameterValue=<value obtained from Route53> \
        ParameterKey=NakedDomainName,ParameterValue=mysitename.com \
        ParameterKey=BucketRegion,ParameterValue=<region where you created your site bucket eg ap-southeast-1> \
    --template-body file://04-cloudfront-yaml
Or from the CloudFormation console:
- From the region drop-down at the top-right select the us-east-1 / North Virginia region
- Launch Create Stack and Upload a Template File and browse to 04-cloudfront.yaml
- Enter the name for your stack - e.g. “mysitename-cloudfront”
- Enter the value for HostedZoneId, NakedDomainName and BucketRegion
- Click Next, Next, Create
Push Content
Finally push your static site content into your NakedDomainName S3 bucket.
Conclusion
And with that - you should now have a static site configuration up and running with https forced redirect and redirection of the www domain name to the naked domain name.