To conduct interviews or podcasts via Skype, you ideally need a way to route audio in and out of Skype and through some digital audio workstation software without going to the analogue domain. This post explains my basic setup and in the next week I’ll post on some variations and extensions including using an external firewire interface, and using Garage Band instead of Ableton Live.
Goals
My goals for my audio routing lash up were:
- To route my Skype caller’s audio into a dedicated track in Ableton Live. I wanted a dedicated track so that if I needed to do any post-processing, I would have that signal on it’s own.
- To also route my Skype caller’s audio to my headphones
- To route my microphone into a dedicated track in Ableton Live. In other words each side of the conversation is on a separate track.
- To also route my microphone to my Skype caller so they can hear me!
- To be able to trigger audio clips from Ableton Live and have them audible to both me through my headphones, and to the Skype caller, and to have those clips recorded into their own track.
OSX Routing Key Findings
I went through at least four major configurations trying to satisfy the goals above using many pieces of software including JACKOSX, Audio Hijack Pro, Soundflower and LineIn. In the end, it was a throw-away reference on some forum to an OSX feature called aggregate devices that gave me the key that I needed to get the whole rig working.
An aggregate device lets you bind two or more physical devices together into a single logical device. Let’s say I create a new device consisting of my built-in input and my ProFire 610 (which has 6 inputs). The resultant logical device would have 8 inputs: inputs 1 and 2 being the built-in input, and inputs 3 to 8 being inputs 1 to 6 on the ProFire.
The reason aggregate devices is key to achieving the routing I wanted is that it enables an application to select one CoreAudio device, but send or receive audio to multiple interfaces.
One other thing before we look at the routing setup: at some point I had noticed that Soundflower 2ch and Soundflower 16ch are completely separate buses. My initial assumption was that Soundflower 2ch was just the lowest 2 channels of the same bus that Soundflower 16 ch routes on. Soundflower providing us with two completely separate virtual audio buses was also key to getting this working.
Routing Overview
With that background on aggregate devices and Soundflower’s buses, here’s a diagram showing the core routing setup. This is all you need to achieve the main routing requirements.
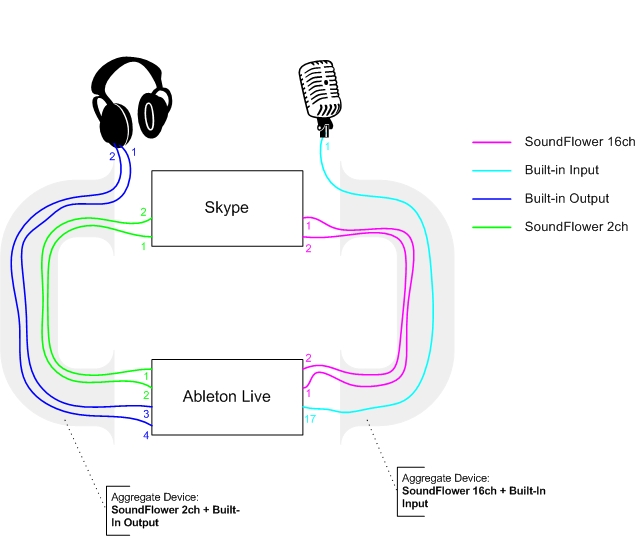
I’ll explain the routing first, then I’ll walk through the setup process:
- We’ve setup two aggregate devices, one for input to Ableton Live and one for output from Ableton Live.
- The input aggregate device binds the Soundflower 16ch bus with the built-in input on the macbook.
- The output aggregate device binds the Soundflower 2ch bus with the built-in output on the macbook.
- Now Skype routes it’s call audio out to Soundflower 16ch, and we plug our mic into the built-in input.
- Ableton receives both these inputs on separate channels, allowing us to record them separately
- Ableton routes it’s audio out to the output aggregate device, with the audio that needs to feed into Skype being placed on the channels that correspond to Soundflower 2ch, and the audio that needs to go to the headphones being placed on the channels that correspond to the built-in output.
- Skype’s input is set to Soundflower 2ch, so it now receives the audio sent to it from Ableton Live
Step-By-Step Setup
The only third-party software required for the basic setup is Soundflower, so make sure that you’ve installed that before proceeding.
Aggregate Devices
First, we’ll create the aggregate devices, then we’ll set the I/O on Skype and Ableton to make the routing happen.
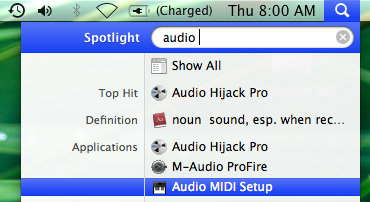
In Spotlight search for and open the Audio MIDI Setup utility.
Go to the Audio menu and choose Open Aggregate Device Editor.
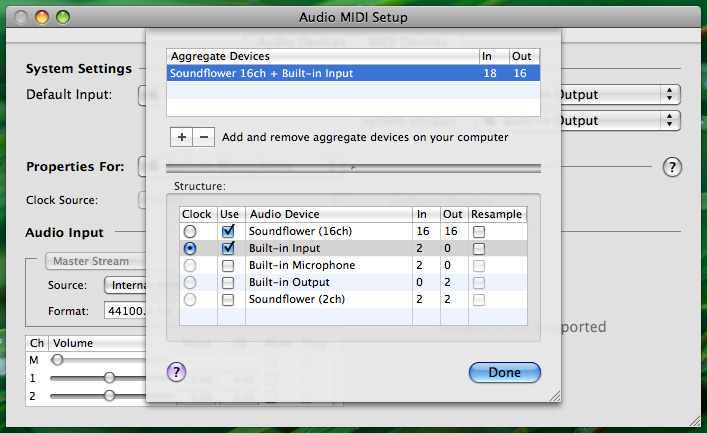
Create your input device as follows:
- Click the add button (+) to create a new aggregate device, and rename it to Soundflower 16ch + Built-in Input
- Click the checkbox for Soundflower 16ch
- Click the checkbox for Built-in Input.
- Set Clock to Built-in Input.
Soundflower 16ch needs to be the first device - you can click and drag the items to reorder them if it’s not. Now your input aggregate audio device should look like this:
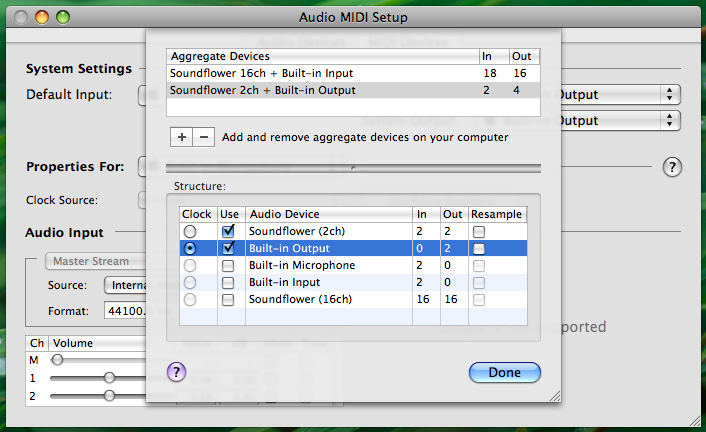
Create your output device as follows:
- Click the add button (+) to create a new aggregate device, and rename it to Soundflower 2ch + Built-in Output
- Click the checkbox for Soundflower 2ch
- Click the checkbox for Built-in Output
- Set Clock to Built-in Output
Again, Soundflower needs to be the first device so reorder the devices if it’s not. Your output aggregate audio device should look like this:
Click Done and close Audio MIDI Setup
Skype Configuration
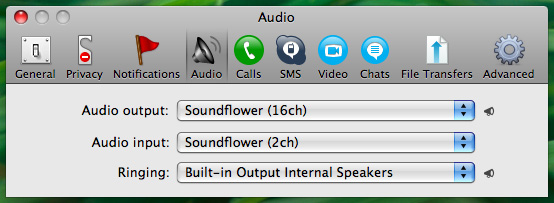
Open Skype, and from the Skype menu choose Preferences, and switch to the Audio tab.
Set Audio output to Soundflower 16ch, and set Audio input to Soundflower 2ch.
Note that as of now, you won’t be able to use Skype other than via Ableton Live. To use Skype normally, just change the audio I/O back to the built-in input and output.
Ableton Live Setup
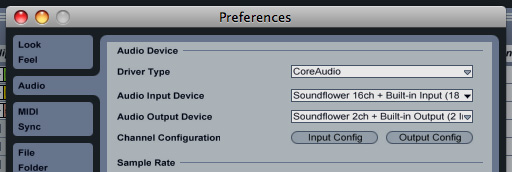
Before we setup our tracks, lets configure the I/O to use our aggregate devices.
From the Live menu, choose Preferences, and select the Audio tab. Set the Audio Input Device to Soundflower 16ch + Built-in Input and set the Audio Output Device to Soundflower 2ch + Built-in Output
Click Input Config, and make sure channels 1 and 2 and 17 and 18 are selected. Remember channels 17 and 18 from the aggregate device are really channels 1 and 2 from the built-in input.
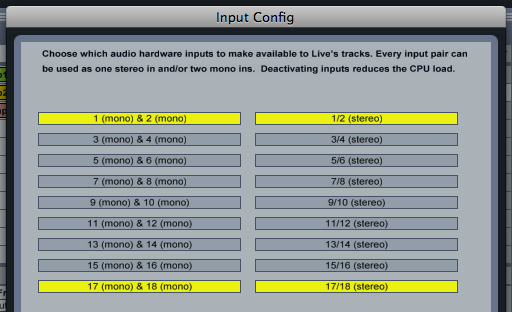
Click OK on Input Config. Click Output Config, and make sure all the channels are available. Remember channels 3 and 4 on the aggregate device are really channels 1 and 2 on the built-in output device
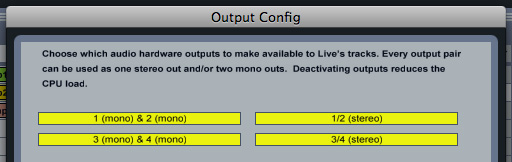
Click OK on Output Config and close the Preferences window.
Now lets setup the tracks. We need three tracks:
- Skype
- Mic
- Clips
Actually there could be many clip tracks, but they would all be configured in exactly the same way.
We also need two sends for submixes:
- To Skype
- To Mic
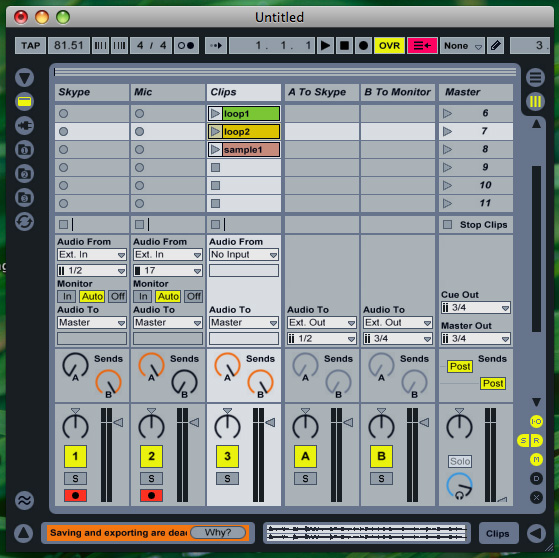
Let’s review this config in detail, starting with the submix sends:
- The To Skype submix routes all audio received directly to Ext Out 1/2 on the aggregate device, which is really Soundflower 2ch. Soundflower 2ch is the device we configured Skype to listen on.
- The To Monitor submix routes all audio received directly to Ext Out 3/4 on the aggregate device, which is really channels 1/2 on the built-in output. So whatever we send to this bus will be audible via the headphones.
- Now all we need to do is route the audio from our tracks to the correct sends. The Skype track’s audio goes only to the To Monitor bus (bus B). We don’t want to put it on bus A because then the Skype caller would get their own audio piped back to them.
- The Mic track’s audio goes only to the To Skype bus (bus A). You can also route it to the To Monitor bus if you want to monitor your own voice as well.
- Finally the Clips sends to both the Skype caller and the monitor headphones so that both participants can hear the clips.
- The Skype track receives it’s input from Ext in 1/2, which is really channels 1/2 on the Soundflower 16ch bus. It sends it’s audio to Master, and also sends 100% to send bus B which is the To Monitor bus.
The master track always receives both inputs and the clips, so during recording we set the level to 0 so that the only audio output comes from the submix sends. To record also don’t forget to arm the Skype and Mic input tracks for recording. You’ll only be able to hear these tracks through the monitor when they’re armed, or when the Monitor option is set to In.
To play back the recording, turn off both the send submix tracks (by clicking the A and B buttons) and bring the master level back up.